Aproda Mobile Data Collection
setup and user guide
Aproda Mobile Data Collection offers the following prinicpal features
- Display of Data on a mobile handheld
- Enter Data on a mobile handheld
- Use scanning-functions on a mobile handheld to interact with Microsoft Dynamics 365 Business Central
- Templates to generate different Input and Display Sites
Logs: Logs can be activated either for each user individually or overall, for all users. If activated every action performed will be logged.
_______________________________________________________________________________________________________________________________________________________________________________
1. Installation
The installation is done through an assisted setup. The installation is described in the following chapter
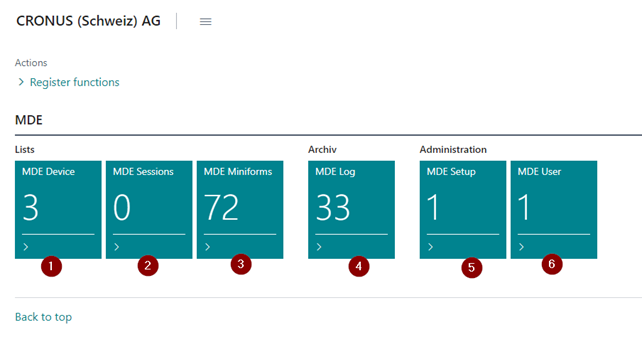
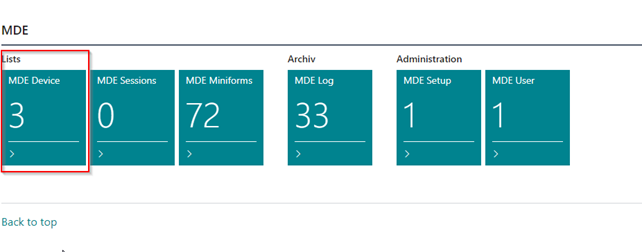
2. Dashboard
The following Dashboard is the entry-point and the overview of the settings of the Aproda Mobile Data Collection module:
| No. | Field in English | Comments |
| 1 | MDE Device | List of all available handheld devices |
| 2 | MDE-Sessions | All active Sessions |
| 3 | MDE Miniforms | All Templates to adjust the visible Outputs on the Handheld Device |
| 4 | MDE Log | Shows all available Logs |
| 5 | MDE Setup | Setup for the ASDM module |
| 6 | MDE User | List of all Users of the ASDM module |
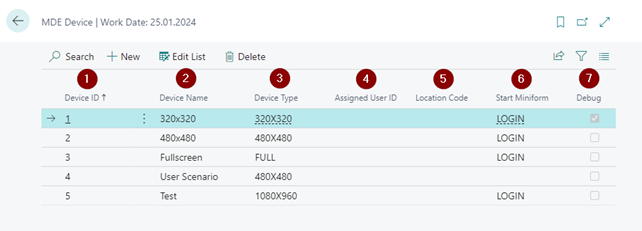
3. MDE Devices
The following settings are set for each handheld Device which interacts with the Aproda Mobile Data Collection App
| No. | Field in English | Comments |
| 1 | Device ID | ID of the device |
| 2 | Device Name | Name of the device |
| 3 | Device Type | Resolution of the device (see chapter 3.1) |
| 4 | Assigned User-ID | Optionally only the assigned user will have access to this device |
| 5 | Location Code | Optionally only the assigned warehouse code can be managed |
| 6 | Start Miniform | Defines which is the first Miniform which will be shown (see chapter 5) |
| 7 | Debug | If activated the MDE Log’s will be activated |
_____________________________________________________________________________________________________________________________________________________________
User scenario 1: Add new device
1. Go to MDE Device
2. Select “new”
3. A new line will be created
4. Define the ID (this must be unique)
5. Define the Device Name
6. Select a Device Type, which will be the output resolution based on your handheld device
7. If needed, then assigne a specific User or leave empty for being able to be accessible by every user
8. If needed, restrict the access to a specific Location code
9. Select the Start Miniform, which will be the Main Miniform which the User will see when he starts the handheld application
10. Select if debugging should be activated on this device
___________________________________________________________________________________________________________________________________________________
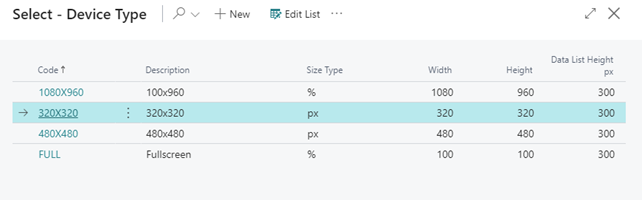
3.1 Resolution settings
The following settings are to define the resolution of the device.
| Field | Comments |
| Code | Code of the resolution |
| Description | Description of the resolution |
| Size Type | Typ of measurement (% or pixel (px)) |
| Width | Width |
| Height | Height |
| Data List Height Lists px | Defines the Height of data lists in pixels |
_____________________________________________________________________________________________________________________________________________________________
User Scenario 2: Add a new Device Type
1. Go to MDE Device
2. Select “Edit List” from the menu
3. Go the the row “Device Type” and open the dropdown
4. Select “New”
5. Enter the code for the new Device Type
6. Enter a description
7. Select which Size Type should be used. This can be either pixels (px) or percentage (%)
8. Enter the Width
9. Enter the Height
10. Enter the Height of the data list
11. Select if you would like to have embedded Images or not
12. Save with okay
_______________________________________________________________________________________________________________________________________________________________
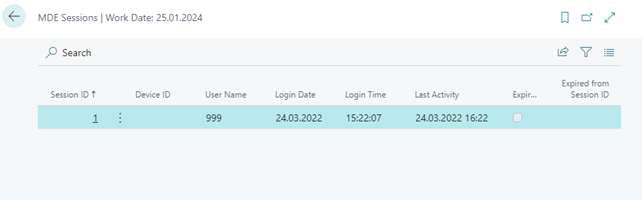
4. MDE-Sessions
Displays all active Sessions as an overview
| Field | Comments |
| Session ID | ID of the session |
| Device ID | ID of the device |
| User Name | User Name |
| Login Date | Date of Login |
| Login Time | Time of Login |
| Last Activity | Times of the last activity |
| Expired | Time when the Session is expired |
| Expired from Session ID | If the Session is expired by a new Session, this ID will be displayed |
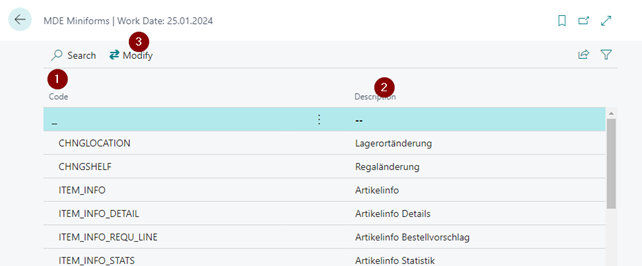
5. MDE-Miniforms
Miniforms are used to design the View on the mobile handheld device.
| No. | Field in English | Comments |
| 1 | Code | Code of the Miniform |
| 2 | Description | Descriptive Name of the Miniform |
| 3 | Modify | Modify the selected Miniform |
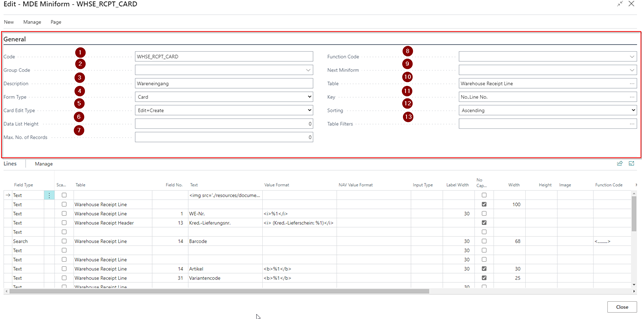
| No. | Field in English | Comments |
| 1 | Code | ID of the device |
| 2 | Group Code | Possibility to group MiniForms by giving it the same name. These will then be displayed grouped together. This has no functional impact. |
| 3 | Description | Description |
| 4 | Form Type | Typ where the following options are possible: Card | Selection | Datalist | Matrixlist |
| 5 | Card Edit Type | I it is a card type, it’s possible to say the typ of edit which is possible Edit | Insert | Edit & Insert |
| 6 | Data List Height | Height of the Data List. If this is empty the value is taken from the device settings |
| 7 | Max. No. Of Records | Amount of Records which will be loaded / 0 stands for infinity |
| 8 | Function code | Possibility to call a function |
| 9 | Next Miniform | If the Miniform has no lines defined, then this Miniform will be shown instead. |
| 10 | Table | Basic Table which this Miniform refers to |
| 11 | Key | Defines what Kind of information on the table needs to be filled out in order to be at the correct place in the table |
| 12 | Sorting | Sorting of the data |
| 13 | Table Filters | Predefined filters |
| No. | Field | Comments |
| 1 | Field typ | Type of the Field Text (Simple Text field) | Input (Input field) | Search (Search field) Asterisk (Field where the value is not shown publicly) Button (a Button | Image (An Image) | Signature (Signature field, where a handwritten Signature can be added) |
| 2 | Scannable | Defines if this field should be scannable or not with the handheld application |
| 3 | Table | Corresponding BC Table |
| 4 | Field No. | Number of the field in BC |
| 5 | Text | Text which will be shown on the card |
| 6 | Value Format | HTML-Tags to format the Value on the mobile handheld - “%1” is a placeholder |
| 7 | NAV Value Format | Navision/BC specific formatting |
| 8 | Input Type | Decimal or number |
| 9 | Label Width | Width of the label in px |
| 10 | No Caption | If checked then there will be no caption |
| 11 | Width | Width |
| 12 | Height | Height |
| 13 | Image | Optional Image |
| 14 | Function Code | Optional Function code for this particular Field |
| 15 | Key Code | If the device |
| 16 | Call Miniform | Call of a specific miniform |
| 17 | New Line | Puts the Line on a new line on the handheld application |
| 18 | Focus | If selected, then the focus will be set to this field when the form is opened on the handheld application |
| 19 | Search Definition | Was wird durchsucht |
| 20 | Relations | Falls Table =/= Table im Kopf dann muss eine Relation hergestellt werden |
| 21 | Variable | Define a Variable which can be used in a Formula |
| 22 | Formula | Formula to calculate values based on the defined variable which then will be displayed as the output text (point 5 in this list) |
| 23 | Not Visible | If selected it will not be visible |
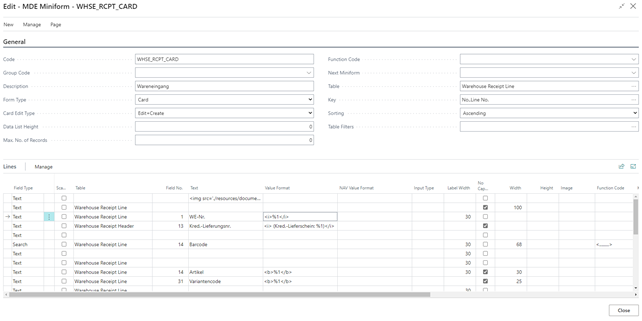
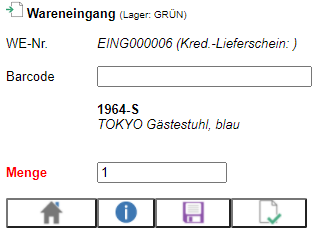
Example of Mini-Forms and their output on the mobile handheld application
For better understanding there are two examples of the Mini-Forms and how they look on the mobile handheld Application
WHSE_RCPT_Card
Settings within Business Central:
Output on the mobile handheld Application:
__________________________________________________________________________________________________________________________________________
User Scenario 3 Create a Miniform which shows how much inventory is existing of an article
Mini-Forms can be creating by coping existing forms or by creating them from scratch. Each maniform can be individually created, therefore this User Scenario is a example to get the understanding of the basic mechanism.
1. Go To MDE Miniforms
2. Select any Miniform
3. Create a new form:
a) Either click on “New” on the Menu and then “Copy Form”. Then it is needed to close the windows and open MDE Miniforms again to see the copied Miniform, which now can be modified
b) Or click on “Manage” on the Menu and then on “New”
4. Fill out the Code for the Mini-form
5. We don’t need a Group Code so we leave this empty
6. We define “Artikelinfo” as the Description
7. Select Card as the form Type
8. Select Edit as the Card Edit Type which indicates that this page will be edit data
9. There will be no Data List so we can leave this field empty
10. Max. No of Records can be set to 0 which is unlimited
11. No special Function will be called for this form, that’s why we leave Function Code empty
12. There is no following Miniforms since we are only looking up article information which means we don’t need an input on Next Miniforms
13. The table is “item”
14. The key will be set to “No.”
15. Sorting we select Ascending
16. Table Filters will not be needed
17. The lines need to be filled out as shown in the picture in the next step
18. Function Code add the following by selecting from the dropdwon:
a) SEARCH-ERR
b) BEEP-SUCCESS
c) CLEARVAL
19. There is no validation of the input
20. The output of the Miniform above will only be visible on the handheld application
21. For a better understanding we’ve added a picture of the output
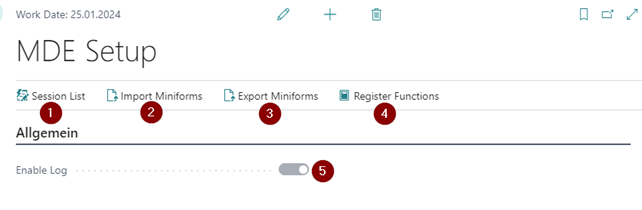
6 MDE Settings
The following settings control the ASMD Application
| No. | Field | Comments |
| 1 | Session List | Lists all concurrent Sessions |
| 2 | Import Miniforms | Import of the Miniforms-Configuration (see Chapter 5) |
| 3 | Export Miniforms | Export of the Miniforms-Configuration (see Chapter 5) |
| 4 | Register Functions | Set Functions (which can be chosen in the lines of the miniforms) to default |
| 6 | Enable Log | Enables Logging |
| 8 | License Key | Amount of active licenses |
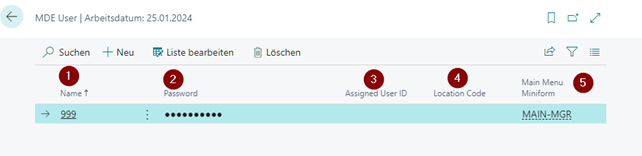
7 MDE User
Shows all User which are registered for the handheld application. The handheld application does not interact with the actual BC user but has it’s own Users and Credentials which are managed in MDE USER
| No. | Field | Comments |
| 1 | Name | User name |
| 2 | Password | Password |
| 3 | Assigned User ID | Assigned BC USER |
| 4 | Location Code | Optional Location code, which when filled out restricted the usage of the handheld application to the defined warehouse code |
| 5 | Main Menu Miniform | Shows which Miniform (see chapter 5) will be displayed as the Main Menu on the handheld application |
_______________________________________________________________________________________________________________________
User Scenario 4: Create a new MDE User
1. Go to “MDE User”
2. Select “New” in the Menu
3. Enter a Username
4. Enter a Password
5. Optionally add a assigned User ID
6. Optionally restrict the access to a specific Location code
7. Select “MAIN-MGR” as the Main Menu Miniform to see the Main Menu
___________________________________________________________________________________________________________________________